Removal and wall preparation
We removed the old finish and loose areas down to a sound substrate, so that the new plaster, waterproofing and tile adhesive would bond to a stable surface.
Illustrative image
Electric heating mat on the shower floor and a heated wall before covering with mortar.
The old finish is removed, walls are exposed to a sound substrate and water pipes are concealed in chases.
Concealed GROHE installation, water outlets and drainage connection for the future wall-hung toilet.
The shower area is set at a separate level, with a raised edge installed and a linear drain prepared.
The main floor has a levelling layer; the substrate is left to gain strength before the next stages.
Linear drain and heating mat in the shower area before covering with adhesive or mortar.
Overall view of the prepared walls, concealed installation and water pipes before enclosure.
Preparing a bathroom for tiling: chases for water pipes, a concealed GROHE installation, a linear drain, a shower area at a separate level, and electric floor and wall heating.
Preparation for tiling is central to this project: water pipes are concealed in chases, the shower area is set at a separate level, the linear drain is positioned in advance, and the heating mats are covered with a compatible layer before further work.
An electric heating mat makes the shower floor warmer and requires precise positioning before tiling begins.
A heated shower wall warms the vertical surface more quickly while remaining concealed beneath the tiles.
The linear drain determines the floor fall direction; its position should be agreed before levelling and tile layout.
The concealed GROHE installation frees up the floor, leaving only the wall-hung toilet and flush plate visible.
Wall chases containing water pipes and the floor levelling layer prepare the bathroom for waterproofing and tiling.
From removing old finishes and chasing walls for plumbing to a GROHE installation frame, shower tray, linear drain and electric floor and wall heating.
We removed the old finish and loose areas down to a sound substrate, so that the new plaster, waterproofing and tile adhesive would bond to a stable surface.
We chased the walls for plumbing, laid and secured green pipes and partially filled the channels. Water outlets for the future sanitary fittings were positioned at this stage.
We installed a concealed GROHE cistern in a metal frame and connected the large grey drain pipe for the future toilet. After rough-in work, the installation is enclosed and tiled.
We formed a separate shower floor area, installed a raised edge and set a linear drain beside the wall. The main floor received a levelling layer and was left to gain strength before further work.
We laid a heating mat on the shower floor and installed wall heating using the same cable on mesh. The mats were then covered with a compatible adhesive or cement layer to prepare for waterproofing and tiling.
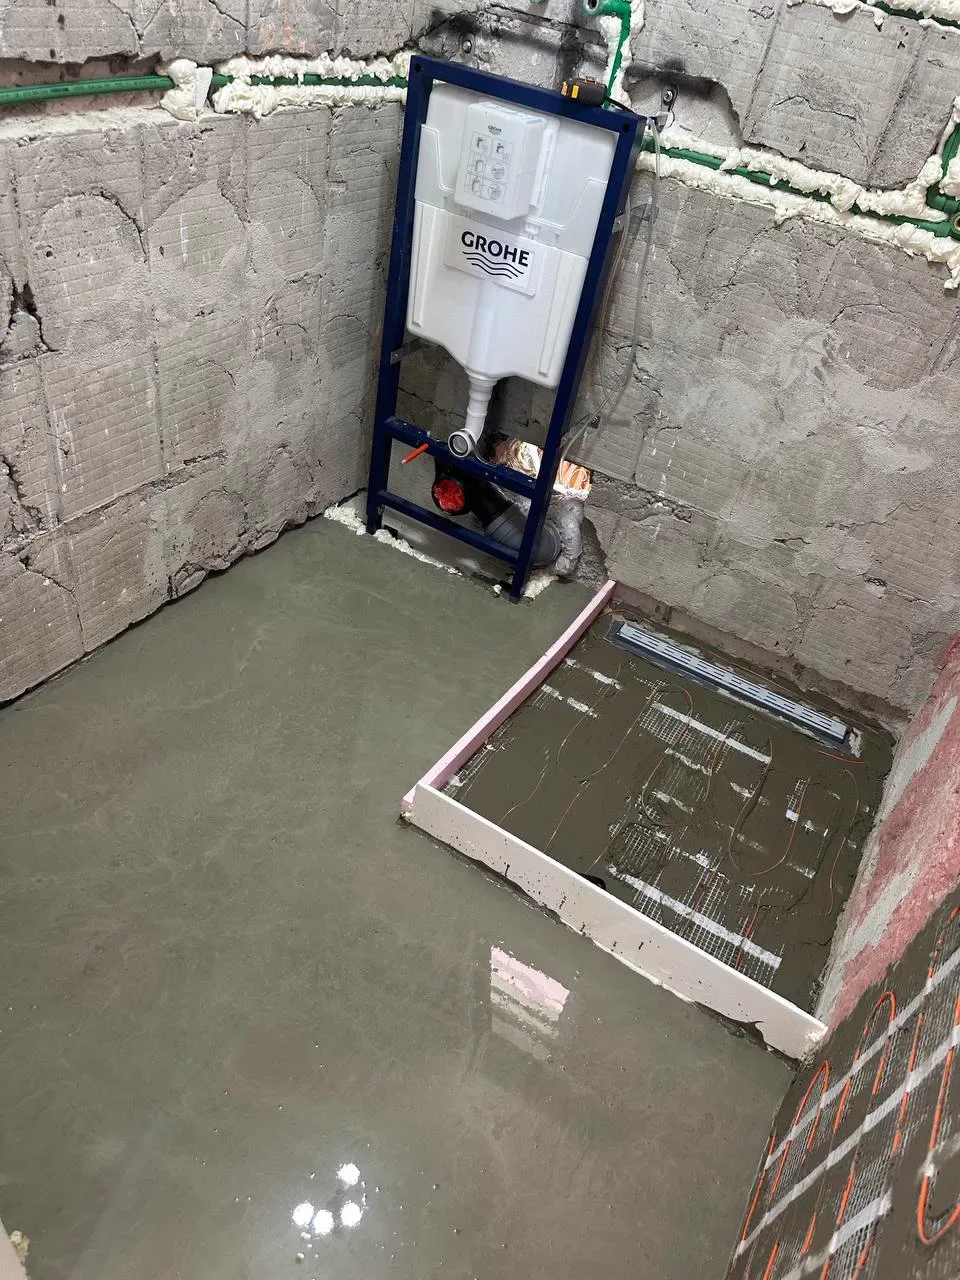
The shower and main floor were formed at different levels, allowing a fall towards the linear drain and separating the wet area from the rest of the bathroom.

Heating mats in a shower must be laid without kinks or accidental clashes with fixings, the drain, plumbing outlets and the planned tile layout.

Before tiling, waterproof the wet area: the floor, corners, floor-to-wall junctions, the drain area and the shower walls.